Posts

Showing posts from September, 2009

Come see the lovely Anne Marie in Bye Bye Birdie!

Image
Hey Everybody, Just wanted to let you know that my wonderful Wife, Anne Marie, is going to be performing in Bye Bye Birdie with the Arlington Players. She has a lead role in the production as the character of Rosie Alvarez and has several major song and dance numbers. I would love if you could all make it out. Performance dates and ticket information is below. Bye Bye Birdie Performance dates: September 18, 19, 20(m), 25, 26, 27(m), October 2 & 3, 2009 Click here to purchase your tickets online.

CRM Asynchronous Process Failure Settings

Image
One of the things I do when setting up a CRM 4.0 server is modify the Recovery settings of the Asynch process. This process tends to have a lot of difficulty recovering if it loses the connection to SQL. Figure 1 By default the service is set to Restart only on the first failure and the restart time is set to occur after 1 minute (Figure 1). The problem is that it typicaly takes a SQL server longer than one minute to reboot. In order to better ensure that you don't need to restart the service manually I typicaly change the Second failure to Restart the Service and set the Restart service after setting to something between 3 and 5 minutes (Figure 2). Figure 2 By tweeking these setting you can help reduce the strain on your support folks by not always having to do a manual restart of this service every time they want to install patches on the SQL box.  Also your users won't be sitting there wondering why their workflows are not kicking off.

Copy data between rows in the same table

So here was my issue. I needed to copy some <binary data> from one row in a table to another row. I tried using the SQL Server Managment Studio but it does not allow you to copy and past binary information. Instead I used a UPDATE... FROM SQL statement. Here is an example: UPDATE LoadTestRun SET LoadTest = b. LoadTest FROM LoadTestRun, LoadTestRun b WHERE LoadTestRun.LoadTestRunID = 4 AND b.LoadTestRunID = 1 Here is the generic format: UPDATE table SET field = b.field FROM table, table b WHERE table.PirmaryKeyID = "Copy To ID" AND b.PrimaryKeyID = "Copy From ID"

Creating a Visual Studio 2008 Results Repository

Learned a very important lesson. If you don't set up a results repository database before running a load test in Visual Studio you won't be able to pull up your reports later. In this example only one machine was being used for load testing and SQL Express was installed as part of Visual Studio. To create the results repository database in SQL Express follow the instructions below. If you want additional information or want to know how to create the database in SQL Standard check out Microsoft's instructions at http://msdn.microsoft.com/en-us/library/ms182600.aspx -Open a command prompt by going to Start -> Run and type in CMD and hit Enter -Type: cd n:\Program Files\Microsoft Visual Studio 9\Common7\IDE -Type: SQLCMD /S localhost\sqlexpress /i loadtestresultsrepository.sql

Moving a secondary site collection to a root site collection

Image
I was recently tasked with migrating a secondary site collection to a new SharePoint server and making it the primary site collection. Here is an example of what a URL looks for for a secondary site collection. http://www.example.com/sites/collection Here is an example of what a URL looks like for a root site collection: http://www.example.com/ You will notices that secondary site collection are placed by default under /sites/ Completing the Migration: 1. Run a backup of the site collection on the original server using STSADM. Here is the command line I used: stsadm -o backup -filename "c:\backups\backup.bak" -url http://www.example.com/sites/collection 2. Copy the backup file to the new server where a new SharePoint instance is created and contains a new root site collection. 3. Run a restore of the site collection on the new server using STSADM. Here is the command line I used. stsadm -o restore -filename "c:\restores\backup.bak" -url http://w...

Changing the MOSS Service Account.... ughhhhh

Bad Idea... Changing the password of the SharePoint service account used to set up and run everything SharePoint. If you have done this read the next paragraph before touching your keyboard again. Worse Idea... Trying to change the password back to what it was, but when confronted with domain password policies that do not allow you to change the password to one you have used recently you delete the user. Then you go in and recreate the user and assign him the old password. IMPORTANT : If you go into the Active Directory Users and Computers under the Administrator tools and you are a domain administrator you can reset the password of any user to whatever you want. Domain policies be damned. So if you have not deleted the service account yet just change the password in the way I just described. Then reset your sharepoint machine and be thankful that you don't have to read the rest of this article. Now lets say you decided to do these two things..... ughhhh. Why doesn't recr...

Register Bamboo Calendar Web Part

Image
I recently downloaded the Bamboo Calendar Plus Web Part v2.5. I ran the setup file and installed both the Calendar Plus Web Part and the Bamboo License Manager v2.7. Here are the issues I ran into: Firstly, you will need to be connected to the internet to get the registration program to correctly activate the web part. Otherwise you will have to activate by e-mail or phone. Secondly, the Calendar web part .dll is not located in the GAC so I had to go out and search for it. The .dll was located in <System Drive>:\Inetpub\wwwroot\wss\VirtualDirectories\80\bin\Bamboo.CalendarViewExtended.dll. In my case my VirtualDirectory was 80 but for others this may be different. Also if you installed the web part into multiple web application you will also need to activate the product by located the .dll under the other VirtualDirectories folders. Then after selecting the .ddl file in the License Manager I entered the product code. I accidently entered an incorrect product code. Then came...

Get SPUser Information for the Document Creator

While working on creating a SharePoint 2007 event handler I needed to get the login name for the creator of the document I was trying to update. This is the code I snagged from a blog article which worked. SPSite oSite = new SPSite("Your site URL"); SPList oList = oSite.OpenWeb().Lists["Your list name"]; SPListItem oItem = oList.GetItemById("Item ID"); string userValue = oItem["Created By"].ToString(); int index = userValue.Index Of(';'); int id = Int32.Parse(userValue.Substring(0, index)); SPUser itemCreator = oSite.OpenWeb().SiteUsers.GetByID(id); After using that information I could then call: itemCreator.LoginName.ToString() Which produces the users login name in the following format "DOMAIN\User".

Grouping Articles By Month

Image
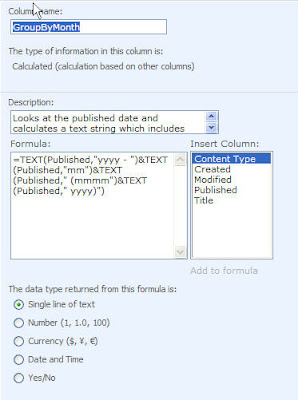
After creating a blog site I wanted to show a webpart that grouped the posts by month. To accomplish this I added a calculated field to my Posts list and used the following formula: =TEXT(Published,"yyyy - ")&TEXT(Published,"mm")&TEXT(Published," (mmmm")&TEXT(Published," yyyy)")                                           You can substitute Published for any other date field within your Posts list. When calculated it displays the date in the following format "2007 - 05 (May 2007)" After completing the calculated field I added a new Posts webpart to the page. I then modified it to the show the "All Posts" view. Then I modified that view to group by the calculated field I created. Note : It is important to change the view of the webpart to from "" to "All Items" after you add the webpart. Otherwise when you uncollapse the grouping the titles and ot...

Tool to embed HTML object directly into SharePoint content

Image
Check out this cool Rick Text Editor add-in that will allow you to embed html such as YouTube and Flash videos. Finally something on codeplex that works! http://www.codeplex.com/erte After installing the tool you will now have a new button on your rich text editor. Click it and you will get a pop-up window into which you can enter your code.